12.27.2010

Mamma makes Anne's Crab Cakes

Oh yes, Christmas food rocks my world!  So does my mom, who is always willing to try something new.  Our holiday traditional food typically consists of stuffed shells (pasta shells stuffed with ricotta and spinach and covered in homemade sauce), lobster tails, and steak...jealous?  This year my dear mother wanted to try something new, so instead of lobster she made crab cakes from scratch.  She used her friend Anne's recipe.  Anne is a Maryland native and bonafide crab connoisseur, so the fact that she would give us her recipe is both and honor and very intimidating all at the same time.

Now, I'm going to give you the recipe as we interpreted it (feel free to not tell Anne that we altered the recipe, should you ever run into her).  My mom thinks every recipe calls for too much seasoning, so we used less than the recipe called for, so if you love salt, take it up a notch.

Maryland Crab Cakes
Makes 9 appetizer size cakes

Ingredients:

5-7 Saltine Crackers
1 tablespoon of Old Bay Seasoning
1/2 lb of chunked crab meat
1/6 cup of mayonnaise
1/2 tablespoon of lemon juice
1/2 tablespoon of Worcestershire sauce
1/2 tablespoon of Dijon mustard
1/2 teaspoon of Tabasco
1 tablespoon of fresh Italian parsley

Preparation:

Begin by chopping the crackers in a food processor until the texture of bread crumbs and out in a large mixing bowl.  Add the Old Bay Seasoning and the crab meat and gently mix with a fork.  Put in the fridge to chill while preparing the wet ingredients.


In a smaller bowl, whisk together the mayo, lemon juice, Worcestershire sauce, Dijon, Tabasco and parsley. 


Gradually (and gently) add just enough of the wet ingredients to the crab mixture that you are able to form small cakes.  Form the cakes and set aside.


To cook the crab cakes, melt about a tablespoon of butter in a frying pan and cook the cakes until golden brown on each side.


Serve with a tepenade, tartar sauce, cocktail sauce, chutney, or really anything else that suits your fancy.

Tips:

If you are feeling industrious, you can use a fresh crab, boil that baby, and then break it open and dig out your own crab meat.  However, I can tell you that this is a lot of work.  So unless you are looking for the experience of cracking open a crab, just by chunked meat at the grocery store.  Drain out any liquid before using.

Be careful not to apply too much pressure to the crab by squeezing it.  You want to handle the crab meat gently and pull it apart with a fork if necessary, rather than your fingers.  This will keep the meat light and unbruised.

Any cracker will do.  Anne would die if she knew that we used Saltines, but the crab cakes still tasted great!

You can prepare the crab cakes the day before and then store them in the fridge until you are ready to cook them.  I wouldn't keep them uncooked in the fridge for more than a day.


12.23.2010

All food is NOT created equal!

I am a huge fan of Whole Foods, mostly because I am kind of a food quality snob.  I really like to eat real food, and not food-like substances...yeah, I'm talking to you Yoplait Yogurt.  High fructose corn sryup and healthy do not belong in the same sentance.  A friend sent this link about shopping at Whole Foods and doing it in a budget friendly way. I really liked it so I thought I would share...

12.20.2010

Birthday Goulash

I got older this week.  Hit a milestone, you could say.  I'm now a full-fledged adult, not only can I vote, drink, and buy dirty magazines, I can now rent a car!  That's right folks, I'm 25!


And oh man, did I celebrate.  My amazing friends and family celebrated my birthday for two weeks.  There was a dinner with my friends at one of my favorite restaurants, Pinocchio's Bar & Grill, dinner at my mom's house, and dinner at my dad's house.

For the big day, I had absolutely nothing planned.  Literally, my plan was to do nothing.  Around 9ish I dragged myself out of bed and promptly made a pot of coffee, transferred a pile of blankets and pillows from my bed to my couch, and snuggled in with a book to waste away in the sunlight streaming in from the window behind the couch.  It was perfect.  My amazing friend and (lucky me) roommate was able to spend the day with me, and in between naps she fixed breakfast and an amazing lunch.  She makes a mean quesadilla!  One was chicken with tomatoes, red peppers, and a ton of sharp cheddar cheese.  The other was steak with mushrooms, onions, and again a ton of sharp cheddar cheese.  They were slow cooked to perfection!

Around 4 o'clock, I finally peeled myself off the couch to frost about 1000 cookies I had made earlier in the week.  Finally, I was ready to begin preparation of my birthday dinner.  Everyone kind of scoffed when I said I wanted to cook my own birthday dinner.  But I was excited, it was the perfect culmination of a stellar day.  "What did you make?", you ask.  Well, if the title didn't give it away, I made a goulash!

I had absolutely no idea what I was doing.  I had watched someone make a goulash before, but really wasn't paying attention.  I also didn't want to look up a recipe.  I know this seems a bit idealistic, but I figure those who make goulash as a staple probably learn their recipe from their parents, grandparents, or just trial and error.  The best I ever has was in Prague, and it was amazing.  Nothing like the one I ended up making, but definitely something to strive for!

Not wanting to look up a recipe, I started with Wikipedia.  I figured this way I would know what comprises a goulash without actually seeing a recipe.  Turns out, I was right!

Goulash is simply onions, meat, and a lot of paprika.  That is it.  According to my Internet resource, you can add all sorts of stuff to make regional varieties, but I wanted to start with the basics.  So, here it is, my recipe for...

Birthday Goulash!

Ingredients:

1 large yellow or white onion
1-2 cloves of garlic (I can't help myself, I love garlic)
1.5 lbs of beef
1-2 tablespoons of flour
Lots of paprika
Olive oil
Salt

Preparation:

I began by defrosting my beef.  If this is your first time checking out my blog, I tend to freeze all of the meat I purchase so that I always have some on hand.  See my recipe for Summer Meatloaf for tips on defrosting meat.  Next I coated the beef with a light layer of flour to help seal in the juices and tossed it all into hot olive oil in a medium sized sauce pan over medium high heat to brown the meat on all sides.  Remove the beef from the pan.

Use this same pan with the remaining fat and oil from the beef to sautee the roughly chopped onion over medium-low heat.  Add a pinch of salt to help the onions begin to breakdown.  When the onions begin to become translucent, add the minced garlic and sautee for another minute. 

When there is a good bit of liquid in the bottom of the pan, remove it from the heat.  Add hot, smoked, or mild paprika (or a combination of all three) bit by bit.  I would say I added about 6 tablespoons, although honestly, I was measuring it out in the palm of my hand.  I would not add anymore than 1/2 cup of paprika.  Stir the onion paprika mixture together until well blended, adding a bit more olive oil if needed.  Return to medium-low heat and add the browned beef, mixing well.  Cover and let the slow cooking begin, checking in on your goulash every so often and give it a stir so the bottom doesn't burn.  Give it 2 hours if you can to allow for extra tender meat.  That's it, that is all there is to it, trust me. 

Tips:

When you are thinking about a cut of beef for your goulash, or really any stew, you want to look for meat with a higher percentage of fat.  Also, your meat does not need to be the most tender cut.  The meat will become gradually more tender as it slow cooks.

Note that when you are browning meat, you are not cooking the meat.  You are using a really hot pan to quickly cook the surface layers, while leaving the middle relatively uncooked.

I think in the future, I would either dice the beef smaller (I used 1 in. cubes) or after it had cooked for a while with the onions and such, I might try and shred it a bit in the pot. 

I served mine with pasta, it was tasty.

12.12.2010

Oh my gad! Breakfast pizza is amazing!

Well for the 3rd blog entry in a row.  Let me apologize for being a huge slacker!  I'm done with school for a good 6 weeks now, so it's back on!


I would like to begin with an amazing meal I was introduced to while visiting my beloved friends in Seattle.  My friend and her husband came up with this little ditty and then shared it with me.  Needless to say, now I'm obsessed and I believe you will be too!  Breakfast pizza is the shiz...

Breakfast Pizza

Ingredients:

1 package of Trader Joe's pre-made pizza dough (or if you have the time, your own pizza dough)
2-4 oz of Crimini mushrooms
2-4 oz of thinly sliced prosciutto
Fresh mozzarella cheese
4 free-range, hormone-free eggs
Olive oil
Salt and pepper to taste

Preparation:

Pre-heat the oven to 475 degrees.

Begin by slicing the mushrooms and prosciutto.  Sautee in a skillet with some olive oil until the mushrooms are cooked and the prosciutto is crispy.


Next start rolling, pulling, throwing the dough...whatever gets the job done.  I must admit, I still suck at this part but I think it will get better with time.  The one package of dough from TJ's makes a large pizza, so if yours is small, keep stretching it.  Use lots of flour on your hands, the rolling pin, the surface your are rolling on, and the surface that you will be baking the pizza on in the oven.  The dough is really, really sticky.

Once you have the pizza dough at your desired size, transfer it to the baking sheet or pizza stone you will be cooking it on.  If you have a pizza stone, well then good for you.  Seriously, they are awesome!  Drizzle some olive oil on the surface of the pizza and spread around with a spoon.  Next, spread the mushrooms and prosciutto over the the pizza, break the mozzarella up and spread over the pizza as well.  The final touch is the four eggs.  Crack them over the pizza and then leave them there to cook sunny side up!  Place the whole pizza in the oven and bake for 10-15 minutes or until the crust is golden brown and the eggs are cooked to your preference (easy, medium, or hard).  Slice and enjoy!

This amazing breakfast is super easy, crazy delicious, and good for you to-boot.  So there!

11.22.2010

Follow up on the Greek Dinner Party...

Did I successfully cook a Greek dinner in under two hours?  Mostly.

Were there 15 guests?  No, only 11.

Given that this was quite the experiment, I am going to explain the order of operations, tips I learned, and a few things I might have done differently.

When I woke up a 6:15 am the day of the party, my first step was to defrost the ground lamb.  As I've mentioned before, I tend to buy a few quality meats when I go to the grocery and then pop them in the freezer right when I get home.  This way I always have some on hand.  For tips on how to defrost meat see my blog entry Summer Meatloaf.  The lamb, a bunch of potatoes, some onions, and some spices were the only items for the meal that I had on hand the morning of the party.  Luckily my roommate was able to go shopping early that day.  Armed with a long and precise grocery list she gracefully executed the hefty job.

When I got home from work at 5:15, my roommate was not home with the groceries, regardless, I immediately got to work.  Fortunately my favorite sous chef, my sister, was able to be there working her magic.  Shortly after, I had some additional help from my roommate and a friend.

We began by preparing the Patatokeftedes (fried potatoes balls).  I had originally planned on having just french fries, but while perusing the Greek cookbook that was a gift from Greece, I stumbled upon this tasty little treat.  I started by peeling and dicing about 10 medium sized potatoes and tossing them in a large pot to boil.  As they cooked, I prepared the rest of the items to mix with the potatoes and my sister began the preparation of the tzatziki sauce.

Tzaztiki is a very simple sauce made with plain yogurt (we used about 20 oz), one finely chopped cucumber, chopped mint (maybe a 1/2 cup), and spices.  I honestly don't know what was in the spice mix, but I do know that it came from Greece and that the label on the package said tzaztiki.  You simply stir all items together in a bowl and place in the fridge so the flavors can meld together.

It was about this time that my roommate returned home with the rest of the groceries and my friend showed up to lend a hand.

The roomie dropped off the groceries and got to work on tidying up the house.  My friend was a good sport and took on the potato balls.  I had the potatoes cooked and drained at that point and the rest of the ingredients in the bowl ready to be mixed.  The other ingredients included 2 eggs, 4 tablespoon of crumbled feta cheese, mint, salt, and pepper.  The boiled potatoes were mashed together with the additional ingredients.  Then, one at a time, formed into small balls, rolled in flour, and then placed in a pan of hot oil, cooking until they were golden brown in both sides.

In the meantime, my sister set up sliced carrots, cucumbers, tomatoes and sliced bread to go with the variety of hummus that we bought for the store.  Yes, we bought it pre-made.  You have to be realistic about some things.

While the other cooks were both hard at work on their items, I began the trickiest items of the night -  the dolmas.  For those of you who don't know what a dolma is, it is a grape leaf stuffed with rice and other tasty items.  The grape leafs come wrapped tightly in bundles of about 15, in a jar full of brine.  I began by boiling a kettle-full of water.  After draining the leafs and delicately unrolling them, I place them in a large pot and covered them in the boiling water.  I let them soak in the water for about 20 minutes.  I'm not sure what this does for the leaves, but that is what the Greek cookbook said, so that is what I did.

Meanwhile, I chopped one large red onion and 4 green onions and put them in a frying pan to sautee with oil.  After the red onion began to become slightly translucent, I added about 1/2 cup of chopped pine nuts and cooked them for about 5 minutes.  Finally, after turning off the heat I added 2 cups of rice and 1 cup of chopped mint, salt and pepper, mixing everything together to make sure it was all coated in oil.

After draining the grape leafs I laid them out flat on a cutting board, filling each with 1-2 tablespoons of the rice mixture and rolling them tightly - ends first, then the sides, like a burrito.  I placed each rolled dolma seem down in the largest, deepest frying pan I own.  When all of the leafs were used up and the pan was packed tightly with dolmas, I again covered them in boiling water and put a snugly-fitting lid on the pan.  The dolmas simmered over medium heat for about an hour.  It was really quite amazing.  When they were finished cooking, the water had all been absorbed, the rice was light and fluffy, and the grape leafs were sealed shut.  I wouldn't have believed it would work, but ta-dah!

As the rest of the guests began to arrive, we had successfully prepared the potato balls, the hummus and veggies, bread, and a lovely Greek salad (prepared by my roommate) consisting of tomatoes, cucumber, olives, feta, and tossed with a simple vinaigrette (olive oil, balsamic vinegar, garlic).   The dolmas were cooking on the stove, and the wine began to flow.

The final step was the ground lamb and turkey.  I made turkey because some people are weird about lamb.  As the dolmas wrapped up their hour on the stove, I began the lamb and turkey.  I stared with some sauteed onions and garlic.  After a few minutes, I added the lamb and turkey to their respective pans and coated them in the gyro spice mix.  This was also a gift from Greece, and once again I have no idea what was in it.

I served the dolmas, the lamb and the turkey with pita chips, tzatziki, and feta cheese.

Tips and things I would do differently:

I think next time we might try to be a bit ahead of the game and go shopping the day before.

I would use less filling in the grape leafs.  They got huge and were hard to wrap.  I ended up using 2-3 leafs per dolma because with just one the rice was exploding out in all directions.  I also would have used more spices on the rice.  Honestly, in my opinion, the dolmas were a bit bland.

Some people are weird about lamb.  Fortunately, my friends are awesome and all love lamb.  Turkey was totally unnecessary.  The next time, I'm just going with what I feel like cooking.  Chances are everyone will try it.  And those who don't...well, that just too bad for them.

Sorry for writing a short novel, but I figured the most important part to share about this experience is the timing.  Trying to cook new food is scary.  Trying to cook new food for your friends birthday party is even scarier.  But, with some strong support and an inability to bow out of a commitment, anything is possible.  To tell you the truth, it was fun, and for the most part, delicious.

11.09.2010

Can I make a dinner party for 15 people in an hour and a half?

Alright.  It is my good friend's birthday tomorrow.  The plan is to make a dinner for 15 people in under two hours between the time I get off work and seven o'clock when the guests are to arrive.  The birthday girl has requested food in a Greek theme.  I've never cooked Greek food before, and honestly it was partially my suggestion.  My roommate brought home spices from her trip to Greece this summer and I have been dying to use them.  So not only is this a time challenge, but it is also a culinary challenge.  Needless to say, I'm a little nervous, a little intimidates, and a lot excited!

The plan is finger foods:

Gyro style ground lamb (turkey for those who are afraid) with tzatziki sauce and pita chips
Dolmas
French fries
Salad with feta, tomatoes, cucumbers, and garlic
Hummus with veggies

And of course dessert, but the birthday girl reads this blog so the desserts will remain a surprise.  The challenge has been set.  I'll let you know how it goes! 


11.01.2010

Halloween is just the beginging of too much food!

I had two of my best friends in town this weekend for the beginning of the holiday season.  We had a fantastic time bumming around, chatting, and of course eating! Oh man did we eat!  Our favorite phase of the weekend was, "I feel bloated."  I know, this might be too much information, but it reminded me that the holidays bring gluttony in America to a whole new level.

Every meal we had this weekend was delicious, but mostly we ate out.  The three of us are typically very healthy eaters, one of us even holds a degree in nutrition, so eating outside of our normal routines really took a toll on our bodies (and our pockets).  The saying, "You are what you eat", is no joke.  If you eat healthy food, you feel healthy.  If you eat shit, you feel like shit.  For me this weekend reinforced what this blog is really about - healthy, fresh, home cooking.

I prepare the large majority of my meals at home.  It took a lot of practice (like 7 years) for me to learn how to purchase food properly.  In light of this, I thought I might share with you some of my methods and my shopping list.  My sister and I go to the grocery store and have produce delivered twice a month.  We buy enough to last us two weeks and then eat in a manner that allows us to take advantage of everything we buy.

When thinking about produce, I try to think about having a variety of fruit and enough for us to have at least 1-2 servings a day, which we typically consume at breakfast.  I order things that last for a short time, like strawberries, and things that last a long time, like apples.  This way we eat the more perishable things first and the sturdier things in the second week.  I also try to order lettuce for the two weeks and salad fixings such as carrots and cucumbers.  The final touch on the produce basket is veggies for dinners and, of course, onions and garlic.  Items like broccoli, hearty greens, potatoes, squashes, and the like will last for a while and provide many options for meals.

The grocery store is reserved for everything else.  Our routine is fairly set.  We can typically make it through the store in half an hour.  We start with bread (two loafs), two gallons of milk, cottage cheese, yogurt, orange juice, lunch meat, a block of basic cheese and a few small specialty cheeses, three to four pounds of organic meat options such as chicken and beef, finally we end with pasta, rice, cereal, granola, and beans.  Through trial and error we've been able to figure out how much of each items is the right amount for us.  Occasionally we purchase long lasting items like oil, vinegar, flour, etc.

Having a variety of quality ingredients on hand makes cooking a delicious puzzle, where combining this with that can create almost anything you want to eat.  It's much more cost efficient then eating out and much better for you.

Just something to think about as we enter the foodiest time of the year.     

10.17.2010

Belly.

I have, admittedly, been a fair-weather blogger lately.  I am ashamed.  Working full-time and taking classes has been tricky, and to top it all off now I have a cold.  Boo.  Needless to say, I have not made anything worthy of a blog post lately, so this week I'm going to blog about an amazing restaurant I've been meaning to write about since I ate there in August. 

Belly Restaurant describes its food as "rustic, European, farmhouse, soul food".  I couldn't agree more!  Located in the bustling college town of Eugene, Oregon, Belly is my kind of place.  It is a small, 10-table restaurant with one or two servers and a exquisite menu that rotates with seasonal foods.  Locals boast that it is a market-to-table kind of place that cuts out the middle man.  The items are unique, and honestly, not for the faint of stomach.  It was the perfect place to enjoy a special occasion with my closest friends, who also happen to be the foodiest people I know.  


The evening began with a few bottles of nice wine from local vineyards.  I was previously unaware, but the area to the east of Eugene is Napa-like rolling hills covered in vineyards with quaint wineries dotting its patchwork frame.  We had an amazing Riesling at Sweet Cheeks Winery.  If you ever have a chance to taste it, please do.

Wine accompanied a variety of appetizers that we passed around so everyone could have a taste.  Delicate gougeres, savory bacon-wrapped fresh figs with apple cider gastrique and hazelnuts, and potted rabbit passed round and round.  What is potted rabbit?  Delicious flaky rabbit prepared in a small clay pot, served with bread, coarse salt, and pickled onion.  It was possibly my favorite part of the meal and I have cravings for it to this day.


Entrees were just as impressive.  I chose chicken and dumplings with wild mushrooms and truffle oil.  It was served in a huge clay bowl, and I ate every last bite.  Others in our party enjoyed everything from pork shoulder confit, to cumin and coriander rubbed skirt steak, to pan roasted salmon.  The meal was savory, fresh, unique and overall amazing.


We finished with a birthday cake from a local bakery and champagne.  Now that is a meal!  

10.07.2010

Super Simple Artichokes

Do I love artichokes?  Why, yes, yes I do!

They can be so simple, and really rather filling.  They may be a little intimidating if you've never prepared one, so I thought I share my preferred method of preparation. 


Begin by slicing off the top of the artichoke where the prickly side is.  Just take off enough to remove most of the thorns.  When you're done you should have a flat surface.  Next, rinse the artichoke thoroughly, gently pulling the top open as you go to get at any dirt trapped inside.  Place the artichoke upside down to drain while you prepare the water.


Fill a pot with enough water to just cover the artichoke while it's upside down in the pot.  Add the juice of one freshly squeezed lemon and a good pinch of salt.  Place the artichoke in the pot, cover with a lid, and bring to a boil.  Ideally the pot will be about as deep as the artichoke is tall (you can slice some of the stem to make a better fit), this will help to keep the vegetable upside down while it cooks.  Cooking in this method is good for two reasons.  One, any remaining dirt will be released.  Two, the steam will help to cook the thicker bottom part of the artichoke where the delicate "heart" is found.  The heart is most people's favorite part, and after nibbling though smidgens of meat, one leaf at a time, the heart seems like a bounty and a real treat.

You know the artichoke is cooked through when you insert a fork into the stem and can push it easily into the bottom of the vegetable.

Remove from the pot and let drain upside down again for a moment or two.  Serve with melted butter, mayo, or olive oil,  and an extra bowl for your discarded leaves.

10.03.2010

Baked Zucchini Sticks

I am all about fried food.  Seriously, on the right occasion, fried food kicks butt.  It is crucial that it be the right occasion, like at a bar with your friends as you begrudgingly watch sports and drink cheep, light beer.  That is the right time for fried food.  For all other times, I try and keep it a bit lighter, on the oil anyway.  Somehow butter and cheese always make it on the menu.

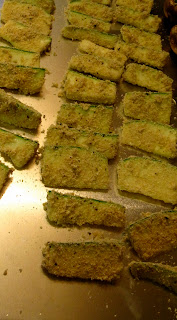
This much lighter version of your traditional fried zucchini sticks is just as tasty, but also much more heart healthy.  Baked items tend to be a bit drier then fried foods, so to even things out I created two savory sauces sure to make your mouth water.  These particular zucchini sticks were extra special because I pulled the zucchini right out of my own garden.  I added a little extra love to the breading with grated fennel and severed them along with my sauteed spinach and cheese stuffed portabella mushrooms for last weeks pizza party

Baked Zucchini Sticks
Makes enough for 8 guests

Ingredients:

1 large zucchini (maybe two or three regular sized zucchini)
1 small sized fennel root
1/2 cup of flour
1-2 eggs
1 cup of breadcrumbs
Salt and pepper to taste

Preparation:

Preheat the oven to 400 degrees.

Start by slicing the zucchini into 2 in long slices, maybe a 1/2 inch to 1 inch thick, and place in a bowl.  I like to start by setting up my assembly line of items for breading.  I place the flour, lightly beaten eggs, and bread crumbs each in their own bowl.  Once my hands get dirty, I don't want to have to touch anything else, so setting up ahead of time is a good way to avoid a big mess.  I also get out a large baking sheet and set it next to the breading materials.

Grate the entire fennel root into the breadcrumbs, add the salt and pepper, and give it a good toss.

Next comes the fun part.  Begin by dredging each zucchini stick in the flower, coat it in egg, and finally roll it in the breadcrumbs.  Neatly place the zucchini on the baking sheet with space between them for even baking.  Working with a handful of zucchini pieces at a time will make the job much quicker.

Place the baking sheet in the oven and cook for 25-30 minutes.


Fancy-Pants Cheese Dip
Makes about 1 1/2 cups

Ingredients:

2 tablespoons of butter
1/4 of small yellow onion
2 cloves of garlic
1 cup of milk
2-3 tablespoons of flour
3/4 cup of shredded cheese
Salt and pepper to taste

Preparation:

Begin by warming the butter over medium heat.  Add the finely chopped onion and a pinch of salt.  Saute the onion until it becomes tender.  Add the minced garlic, more salt and the pepper, and cook for another minute.  Vigorously stir in the milk and flour, and bring to a light boil.  The mixture will begin to thicken.  Stir frequently so that the bottom does not stick and burn.  

When the mixture reaches the desired consistency, remove from the heat and set aside for a good 10 minutes so it can cool a bit.  When the mixture has sufficiently cooled, add the shredded cheese of your choice and gently mix.  Transfer to a serving bowl.   

Tips:

In my case I used a blend of white aged cheeses and mozzarella. The ages cheeses contributed a savory flavor, while the mozzarella added depth.

If you add the cheese too soon, the heat will cause the cheese to melt too quickly and the mixture will become stringy.

Quick Marinara Dipping Sauce
Makes 1 1/2 cups

Ingredients:

2 tablespoons of olive oil
2 cloves of garlic
1/2 small yellow onion
2 carrots
1 1/2 cups of marinara sauce from a jar (it's not cheating, it's enhancing.)
Salt and pepper to taste

Preparation:

Begin by heating the oil over medium-low heat.  Add the onions, finely chopped, and cook until tender.  Add the minced garlic and cook for another minute.  Grate the carrot (a trick I learned from an Italian girl I met in Spain) and add to the pot.  Add salt and pepper between each layer to release the juices and get the flavor out in full effect.  After the carrots begin to look tender, add the marinara sauce.  Stir everything together and bring to a simmer.  The longer it cooks, the better the flavor.  It all depends on how much time you have.  I try and give it at least 10 minutes.  Transfer to a serving bowl.

So there you have it.  Fancy bar food.  Enjoy! 

9.28.2010

Sauteed Spinach and Cheese Stuffed Portabella Mushrooms

That's a mouthful!

Last weekend I had some good friends over for a good meal all centered around this amazing pizza that I received as a gift.  I wanted appetizers that would typically accompany a pizza, but I wanted them to be fancier.  The night before my dinner party I had deep fried mushrooms at a local college pub, which inspired these puppies.  And, if I dare say so myself, they were delicious.

Sauteed Spinach and Cheese...eh, you know the rest...
Make enough for 8 guests

Ingredients:

18 small portabella mushrooms
1 lb of baby spinach
1/2 of a small yellow onion
2 cloves of garlic
Salt and pepper to taste
1 cup of grated cheese (mozzarella, parmesan, asiago. Think soft and hard.)
Olive oil

Preparation:


Heat a tablespoon of olive oil in a large saute pan over medium-low heat.  Add the finely chopped onions and sprinkle with a touch of salt and pepper.  Let the onions cook for 5 minutes or until they begin to become a bit translucent, stirring occasionally.  Add the minced garlic and cook for a minute.  Then add the entire pound of washed baby spinach.  Sprinkle with more salt and pepper.  Toss to coat with olive oil.  Add a bit more olive oil if there is not enough liquid in the pan, you don't want the spinach to stick.  Cover and let the spinach saute and reduce until you have about 1 1/2 cups of cooked spinach.  Put the spinach in a bowl and set aside.


Preheat the oven to 400 degrees.

While the spinach is cooling, prepare the portabella caps.  Remove the stem from each cap and clean the caps thoroughly.  Place the caps upside down on a large baking sheet lined with aluminum foil (the recycled kind).  Drizzle a few drops of olive oil on each cap.

Add the grated cheese to the cooled spinach and give it a good toss to mix.  Fill each mushroom cap with about a tablespoon of the mixture. 


Bake in the oven for 15-20 minutes or until the cheese is bubbly.

Tips:

Use a damp towel to remove any dirt from a mushroom cap.  This will help prevent the mushroom from absorbing too much water.  Mushrooms will absorb a large amount of water if rinsed directly under the tap.  This may result in soggy mushrooms after baking.

Make sure the sauteed spinach is cooled before you add the cheese.  You don't want the cheese to melt before you put the mushrooms in the oven.


9.26.2010

Dinner Party. Success!

My friend brought me a Chicago-style pizza from Chicago.  That's right, from Chicago!

First, let me explain that she had to call in the order and collect the frozen pizza on her way to the airport.  Then she had to carry the pizza (which, I kid you not, weighs at least 50 lbs.) onto the plane with her because you can't check a pizza and pick it up at baggage claim.  She handed it over to me a day and a half later still frozen and so amazing. 

I had never seen a Chicago-style, stuffed crust, cheese pizza before and can I just say, "Wow!"  It was 3 inches thick!  I also had no idea that the pizza was not just stuffed crust, it was a stuffed pizza.  Think about a huge apple pie, now change the pie crust to pizza crust and the fruit filling to pounds of mozzarella cheese, smother it in marinara sauce and, ta-da, a stuffed Chicago-style pizza.  You've never seen a stuffed pizza before either? Check it out!  Giordano's has been rated as some of the best pizza by The New York Times, so this was a serious pizza.

I wanted to share with the dedicated delivery lady and some other folks who I thought might appreciate a special treat, so I decided to have an impromptu dinner party.  I went for a three (it ended up being more like five) course dinner with some jazzed-up appetizer classics and the pizza as the center piece.

Early afternoon shopping left my sister (also known as my favorite sous-chef) and I inspired to get a little festive.  We purchased a bouquet of warm red, orange and yellow daisies and sweet little pumpkins to act as center pieces for the night.  


Then we got to cooking.  I wanted everything to be ready to pop in the oven when the time came so I could enjoy my friends and have a tidy house to boot.  It took me about 2 hours to prep, but I had the dishes done and food ready to go just in time for my first guests to arrive.

After everyone had their drink of choice in hand, we started with some garlic bread that was brought by friend.  It was, of course, an instant classic.  Next came the sauteed spinach and cheese stuffed portabella mushrooms, then the baked zucchini sticks with two different dipping sauces.  Finally the guest of honor, my dear cheese pizza, and a lovely salad made the final touches on dinner.  My roommate was kind enough to fix us all some chocolate mouse for dessert, a perfectly light way to finish off a very rich meal.

As everyone departed stuffed to the brim, I reflected on the night, my amazing friends, and a damn good meal.  Dinner party.  Success! 

Recipes to follow.  This post is already ridiculously long...

9.16.2010

Oh, boy! Sweet potatoes!

It is getting to be fall!  You know how I know?  I got sweet potatoes this week in my organic produce basket.  I feel like most people don't know the difference between a yam and a sweet potato.  If you care to find out you should visit this link.  All you really need to know is that you are most likely eating a sweet potato because yams are harder to come by.

There are so many ways to enjoy sweet potatoes!  You can bake 'em, boil 'em, mash 'em, and smash 'em.  They also do lovely as fries.  This simple recipe is quick, easy, and really tasty!

Sweet Potato Fries 
Serves 4

Ingredients:

1 lb of sweet potatoes
1 teaspoon of crushed dried garlic
1 teaspoon of crushed dried onion
1/2 teaspoon cayenne pepper
1 teaspoon of fresh ground pepper
1 teaspoon of sea salt
1-2 tablespoons of olive oil

Preparation:

Preheat the oven to 400 degrees.

Wash and peel the sweet potatoes.  Slice them into roughly 2-3 inch long wedges and don't make them too chunky or they will take a really long time to bake.  In a mixing bowl, toss the sweet potato wedges, garlic, onion, pepper, sea salt, and olive oil until the potatoes are well coated.  


Spread onto a baking sheet lined with aluminum foil and bake in the oven for 15-20 minutes or until the fries are tender.  Give them a toss about half way though the baking time for even cooking.

Tips:

Did you know that they make recycled aluminum foil?  Well they do, and if you're like me then you use foil frequently to improve cooking and cleanup.  Do mother earth a favor and used recycled materials if possible.

9.13.2010

Lamb Burgers!


So, you don't like lamb?  Well, I think you're just silly.  Lamb is an amazing red meat.  It is best enjoyed cooked medium-rare to avoid letting the meat get too "gamey".  One of the restaurants I've work in used to have the most amazing lamb burger on the menu.  It dripped with goat cheese and kalamata olive tapenade.  Oh, it was so good.  Then, as usual, they changed their menu and I was left wishing I could have just one more bite. 

My solution was, of course, to make my own lamb burger and satisfy my craving or the super savory meat enjoyed by millions world wide.  I guess what I'm trying to say is don't be afraid of lamb.  Everyone else eats it, why shouldn't you?

Lamb Burgers
Makes 4 good sized burgers

Ingredients:

1 lb of organic ground lamb meat
1 small red onion
1 teaspoon of crushed dried garlic
1 egg
1/4 cup of plain bread crumbs

Preparation:

I, of course, began with frozen lamb meat.  I wish so bad that I had a grocery store near by that sold quality meat and I could go there nightly and pick out my meal, but the closest one is 20 minutes away and I'm too lazy for that.  For tips on defrosting meat see the Tips section of my blog entry Summer Meatloaf.

Preheat the oven to 400 degrees.

Combine the ground lamb, finely chopped red onion, garlic, lightly beaten egg and bread crumbs in a large mixing bowl.  Roll up your sleeves and mix with your hands.  This will help mix everything together thoroughly without the meat getting tough.


Form the mixture into 4 patties and set aside.  Warm a small amount of olive oil in a large frying pan over medium-high heat.   Sear the patties on each side for a minute or so, or until the they are golden brown.  Transfer to a baking sheet and pop 'em in the oven for 3 minutes on each side.  After you take them out of the oven, let them rest for a few minutes to help keep them moist.

You can top the burger with whatever you please.  Personally, I like a toasted bun, curry ketchup, olive hummus, garlic mint cheese spread, a soft cheese like goat cheese, and lettuce.  


I served the lamb burgers with a hearty helping of collard greens and a light pasta salad my mom made.  For cooking suggestions for collard greens see, What in the heck do you do with kale?


Tips:

When you think lamb, think Mediterranean.  Lamb pairs well with olives, mint, yogurt, flat breads, feta, cucumbers, onions, and tomatoes. 

You can make the burger patties a bit smaller, my mom would never approve of a 1/4 lb burger, but it's easier to control how well the meat is cooked with a larger burger.  A small burger is really easy to over cook.

I did not make my own hummus or cheese spread.  The good people at Whole Foods helped out with that one.  I believe cooking is 80 percent great, fresh produce.  20 percent fun pantry items.

9.06.2010

What in the heck do you do with kale?

I cut out the middle man, grocery stores I mean, by buying my produce directly from a company called Basket Case Organics.  I love this company for a number of reasons...

One, they deliver a basket full to the brim with beautiful, organic produce to my front door.  
Two, it is very competitively priced.  
Three, it is a local company that I am happy to support.
Four, everything is seasonal and it forces me to cook outside my comfort zone.

Recently, one of the items included in my basket was red kale.  For those of you who don't know what kale is, it is a very fibrous, bitter, green, leafy vegetable.  What in the heck do you do with kale?  Well, I wasn't sure exactly.  So, like many great thinkers before me, my solution was to have few glasses of cava, followed by a few glasses of wine.  Then, right on cue, it struck me!  Saute the kale with butter and anchovy paste and stuff it in a pork chop, of course!


Kale-stuffed Pork Chops with Mashed Potatoes and Gravy
Makes enough for 2 servings

Ingredients:

4 cups of uncooked kale
3 - 4 tablespoons of butter
1/4 teaspoon of anchovy paste
2 cloves of garlic
1/4 cup of shredded mozzarella
2 thick pork chops
4 medium sized potatoes
2 green onions
2 tablespoons of sour cream
1/4 cup of milk
1 cup of chicken stalk
4-5 tablespoons of flour
Salt and pepper to taste, on everything.

Preparation:

Begin with the kale.  The first step is to remove the red/purple stem of the kale.  Basically, this will not cook down, so it's best to remove it.  Roughly chop the kale.  Over medium-low heat in a large saute or fry pan begin to melt 3 tablespoons of butter.  As it begins to melt, add the anchovy paste and mix butter and paste to blend.  Immediately add the kale and a good pinch of salt.  Give it a good toss to coat.  Cover and let the sauteing begin.  You will want to let the kale reduce to about a cup, stirring frequently.  About 1 - 2 minutes before you are going to pull the kale from the heat, add another tablespoon of butter and the finely minced garlic.


Once the kale is done, in a large sauce pan bring salted water to a boil.  Add the potatoes, diced, and cook until tender.  When they potatoes are done, drain from the water and set aside until you are ready to mash them.  Keep them covered so they stay hot, it makes for easier mashing.


Meanwhile, begin stuffing the pork chops.  To make the stuffing, remove the kale from the pan mix with the mozzarella cheese in a small bowl and set to the side.  Save the pan on the stove as you will use it later.  Make a 2-3 inch cut in the side of each pork chop.  The incision you create should not cut the pork chop completely in half, but rather create a little pocket with about a quarter inch of the pork chop intact on all sides except where the opening is.  Turn the pork chops on their sides with the pocket facing up.  Stuff them with the kale and mozzarella mixture. Secure the opening with toothpicks.

Pre-heat oven to 375 degrees.  Warm a tablespoon of olive oil over medium-high heat in the same saute pan you used for the kale. Sear the pork chops on each side for until nice and golden brown.  Transfer the pork chops to a baking sheet and cook in the oven for 10 - 15 minutes or until cooked through.

While the pork chops are in the oven, finish the mashed potatoes and the gravy.  

As promised, I learned how to make gravy using drippings (after my mom laughed at me when I created a make-shift carmelized onions and crimini mushroom gravy).  So here it goes.  Begin by warming the saute pan from the kale and pork chops over medium heat.  When it gets toasty, add the chicken stalk while whisking to get all of the deliciousness off the bottom of the pan.  Bring the mixture to a light boil.  Once boiling, add one tablespoon of flour at a time every few minutes until the gravy reaches the desired consistency and thickness.  Add salt and pepper to taste.  Run the gravy through a strainer and into a bowl to remove any large bits.  Set aside.

Make the potatoes by mashing them together with the finely chopped green onions and sour cream.  Warm the milk and add a little bit at a time until you reach a desired constancy. Some people like chunkier mashed potatoes, and some like creamier mashed potatoes.  It's all a matter of preference.

Assemble your plate with a pork chop, a hearty helping of mashed potatoes, and cover in gravy.  Oh, don't you feel gourmet!


Tips:

Obviously, since I had a few drinks in me, I didn't run out and buy my pork chops fresh.  I pulled them out of the freezer.  For tips on how to best defrost meat, see my blog entry Summer Meatloaf.

I love anchovy paste!  People tend to think anchovy paste is gross, but they are relying on preconceived notions and are quite mistaken.  When mixed with some butter, the paste provides a fantastic salty, savory quality you'll be hard pressed to find any other way.  You can keep a tube on hand in the fridge for quite a while.  I would suggest anchovy paste for any green veggie that you are not sure what to do with, like collard greens, chard, Brussels sprouts, etc.