8.27.2010

Stuffed Zucchini Blossoms


I had stuffed zucchini blossoms once at a restaurant.  This was years ago.  I don't know what made me think that I could replicate the delicate taste, but when I saw some blossoms for sale at a local farmer's market, I couldn't help myself.  I purchased five blossoms and began thinking of ways to make them tasty.  This recipe could be changed in a million different ways, but I think the key is to use a cheese that melts.  It gives the zucchini blossoms a more savory texture.


Stuffed Zucchini Blossoms
Makes enough for two people

Ingredients:

5 fresh zucchini blossoms
1/2 cup of your favorite cheese (goat cheese, cream cheese, ricotta, fresh mozzarella, etc.)
1/2 small zucchini
1/4 teaspoon salt
1/4 teaspoon pepper
1 egg
1/2 cup of flour
1/2 cup of bread crumbs

Preparation:

Begin by making the stuffing.  Chop the zucchini into very small pieces.  This stuffing will need to fit into the zucchini blossoms, and they are not very big.  In a small bowl, combine the cheese, chopped zucchini, salt, and pepper. 

Take the blossom, and delicately open it.  They have a sort of natural seam and you should be able to open them fairly easily.  Remove the yellow/orange stamen from the inside of the flower.  Holding the blossom open with one hand, begin stuffing it.  You can pack a good amount of stuffing into the blossom, but don't fill above the natural cup line.  This will help to keep the stuffing from escaping while the blossoms bake.  Re-twist the blossom so it resembles its original structure and secure with a toothpick.

In 3 separate bowls, place the lightly beaten egg, flour, and bread crumbs.  Dredge each blossom through the flour, egg, and breadcrumbs respectively until well coated.  Place on a baking sheet and bake in the oven at 350 degrees for 20 minutes, turning the blossoms once or twice.

Invite your friends to eat and enjoy!

8.23.2010

Farmer's Market Fruit Salad

One of my favorite parts of summer is the farmer's markets that pop up all over the city.  You can find a little street or parking lot blocked off and full of beautiful fruit almost any day of the week throughout the summer months.  One Sunday morning on our way home from yoga, my sister and I passed the West St. Farmer's Market and couldn't help but stop to browse.  Browsing, of course, led to purchasing and we came home with some lovely peaches and berries.  Almost immediately after walking in the door I was in the kitchen whipping up this super simple fruit salad.


Berry Salad with Orange Dressing
Make 4 servings

Ingredients:

1 4 oz package of raspberries
1 4 oz package of white raspberries
1 4 oz package of strawberries
1 orange
1 handful of fresh mint
1/2 teaspoon raw sugar

Preparation:

Rinse all berries and let dry a bit.  Slice the strawberries into bite size pieces so that they are roughly the size of the raspberries.  Place all berries in a bowl.

Take the orange and rub it between your hand and the counter a few times.  This helps to loosen the juices before slicing it open.  Squeeze half of the orange into a separate, smaller bowl. Roughly chop the mint.  Add the mint and sugar to the bowl and whisk to emulsify.  Add the orange dressing to the berries and toss to coat.

8.19.2010

Recipes for Your Percolator

Are you wondering why I would write a post about espresso and then not bother to give you any recipe ideas? I mean espresso, on its own, without any "extras" is intense. It can be a small, tasty treat from time to time, but all the time is a bit much.

I would say espresso is best enjoyed after a large meal when your tummy is looking for something to help it settle into the post-consumption phase. More often espresso is appropriate for mixing with other ingredients to create a coffee drink. Here are some of my favorite, easy to make at home recipes.

Cafe con Leche

This simple drink is the reason I purchased a percolator in the first place. Growing up in the US I was used to large (trust me a 20 oz drink is very, very large on a global scale), sweet, mostly milk, coffee drinks. When I moved to Spain for a semester in college, I felt deprived. No where in Madrid served a 20 oz coffee of any sort. The first time I asked for a coffee para llevar, the middle aged man behind the counter laughed at me. They don't take coffee to go in Spain. You stand with your 2 oz beverage at the counter and drink it from a little glass cup.

It took me a while to get used to the idea of standing around drinking coffee, but once I understood the point of it, I was hooked. The point, to Spaniards, is that drinking coffee is an experience. You enjoy the coffee, chat with other patrons, and take a moment to stop and breathe. How nice!

When I returned to the US, I again felt deprived. I couldn't figure out how to get my regular haunts to make a cafe con leche for me. Any combination I could think of would fall short of the real thing. I didn't get it. How hard could it be - 1/2 espresso, 1/2 milk?

The trick, I learned, was that I was over-thinking it. A cafe con leche is a simple drink made from 1 part espresso and 1 part warmed milk. I think the milk is the key. It's not steamed milk, it's warmed milk. They would use an electric burner at the cafes in Spain.

So, I started thinking hard about how to recreate this drink at home. I remembered that every home in Spain had a percolator. Unlike an expensive espresso machine (you have to buy a super pricey one to make anything decent), the percolator could be purchased for $30, is easy to clean, and makes quality espresso. And ta-dah, that leads us to my previous post...Coffee is amazing!

Now the recipe...

Ingredients:

1 freshly brewed batch of stove-top (or electric) espresso
1-2 oz of 2% organic milk

Preparation:

Warm the milk on the stove, or, if your lazy like me, in the microwave for 15 seconds. Pour 1-2 oz of the espresso into the milk. Stir. Smell. Enjoy.


Americano

This is a classic that can be found in any local coffee shop. It is most similar to a regular cup of drip coffee. It is basically a mix of espresso with hot water, and is most often how I enjoy my morning pick-me-up.

Ingredients:

1 freshly brewed batch of stove-top espresso
Hot water
Organic dairy addition of preference

Preparation:

Prepare espresso and boil water in a kettle. When both are ready, mix equal parts espresso and hot water in your favorite mug. Add milk, cream, or leche de agua (this is what my Hispanic friends call skim milk, I think it's an astute label).

The espresso-to-water ratio honestly depends on your preference. More water = weaker coffee. Less water = stronger coffee.

Lattes and Cappuccinos

Ok, so you have, have, have to have foam on your coffee drinks. Fine. You can do that at home too, and again without an expensive espresso machine. Using an electric milk frother, you can get crazy in your own kitchen. These handy little devices are available from $15 - $100. I'd say don't spend more than $30, it would be totally unnecessary. They will whip up some lovely foam in no time at all. I don't personally own one, but I've seen them in action and they work really well.

Ingredients:

1 freshly brewed batch of stove-top espresso
Organic milk of your preference

Preparation:

Brew coffee. Warm milk on the stove or in the microwave until hot. In a glass or metal container froth the milk until foam develops. Using 1 oz of espresso for every 1 shot you would usually order at a cafe, pour the non-foamy milk from the bottom of the container into the espresso first, then top with foam.

The main difference between a latte and a cappuccino is the amount of foam. Lattes are mostly milk with a little bit of foam, cappuccinos are mostly foam with a little bit of milk.

So there ya go! I hope this brings many pleasant coffee experiences your way. And do as the Spaniards do...take time to breathe and enjoy your coffee and your life.

8.16.2010

Coffee is amazing!

I don't know about you, but I really don't like waking up in the morning. Some people jump out of bed ready to greet the day. I tend to roll out sideways, stub my toe on the dresser, curse myself for not going to bed earlier and then walk blindly into the kitchen on the hunt for one thing...coffee.

I am fully willing to admit that I am a coffee snob. I've spent most of my young-adult life working as a barista. I even spent some time serving Joe in Seattle, where I transformed from a coffee brat to a full-blown snob. I think that a cup of coffee can make or break your day. A quality cup will leave you feeling satisfied and ready to go. A crappy cup will leave you jittery and wanting more.

I'm on a budget so I can't afford to buy coffee from a cafe, making my wantonness for quality coffee a challenge. As it turns out I don't have to outsource my coffee, I can make quality espresso at home without an expensive machine. This is a trick I picked up while living in Europe and I'd venture to say it's improved my quality of life. Yeah, that's a ridiculous statement, but I stand behind it...

The Percolator!
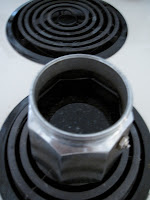
The 6-cup size makes 6 shots of espresso which equals roughly 2 cups of coffee.

Step 1 - Grind it! Don't skip this step by using pre-ground coffee. Grinding coffee beans right before you use it enhances flavor and caffeine. Plus it smells amazing! Percolators have a basket that holds the coffee and water boils up from the bottom, through the coffee, through another screen and then into the "holding chamber". You want your coffee to be at a medium-fine grind - similar to the texture of sea salt. If the grind is too fine, coffee grounds will seep through the screens and into your coffee - ick. If the grind is too course, the water will pass through the basket without gathering enough flavor and your coffee will be watery - double ick.


Step 2 - Fill the bottom chamber with water. There should be a fill line on the inside of the bottom chamber. Fill to this line, no more, no less. Oh, and use cold water! It makes boiling take longer and flavor taste better.


Step 3 - Fill the basket with ground coffee. Fill it to the top, but don't compress it or flatten.


Steps 4, 5 and 6 - Place the basket in the bottom chamber, screw the top chamber on tightly and turn the stove on high.


Step 7 - Let the percolator do its thing. It will begin to make a boiling sound, don't panic. Wait until the sound stops and that is how you know it's done!
Tips:

Look for organic, fair-trade coffee, from a local company if possible. This promotes a healthy earth and more economic stability on a local and international scale. The coffee may be a bit more pricey, but you will need less of it since the percolator only uses a small amount per brew.

Espresso is a stronger blend then other coffee beans and roasts. You can use an espresso roast or a regular roast (like a French roast) depending on the amount of caffeine you are looking for.
Learn to enjoy your coffee. As with eating meals, if you can make drinking coffee a pleasant treat for your senses you will find you need less of it.

My favorite brand of percolator is the Biaetti Moka Express. This particular product comes in a variety of sizes and there is a stove-top option as well as an electric counter-top option.


8.11.2010

Avocado Pear Salad

Recently, I've had the opportunity to try out baking and cooking on a whole new level. My step-mom is allergic to gluten, soy, and dairy. I thought this would make cooking impossible, but really it's just a much welcome challenge. This recipe is one of her own creations and is a delicious, allergy friendly salad.

Jeaneen's Avocado and Pear Salad

Makes enough for 6 people
Ingredients:
2 bags of Trader Joe's Butter Lettuce with Radicchio
2 ripe pears
3 ripe large avocados
2 green onions
1-2 bags of Trader Joe's Candied Pecans
Salt and pepper to taste
Cindy's Kitchen All Natural Raspberry Nectar Vinaigrette
Preparation:
Chop all vegetables and toss in a large mixing/serving bowl. Lightly drizzle with vinaigrette and toss. So simple!
Tips:
This salad is gluten, dairy, and soy free because the ingredient labels on the pecans, lettuce and vinaigrette have all been carefully scoured for sources of bellyaches. There is a strong possibility that if you took the time to carefully read the ingredient labels you could find these items at any store. Also, if you don't have food allergies, you could get creative and use a variety of nuts and dressings.
I would suggest adding the vinaigrette right before serving. The salad tends to become a well coated mixture of avocado and lettuce which is delicious when it's fresh, but it can definitely get soggy if left to sit for too long.

8.09.2010

Eating Less Meatier

I received the following question from a reader: "How can I eat greener and less meatier?" Since my answer ended up being the length of an epic novel, I figured I should just make it a post.
 
I think the first thing to embrace when trying to shift your diet is that you must have an open mind! You will need to eat things that you might not be used to, and at first they might taste strange or your body might have unexpected reactions, but if you give it time everything will begin to seem normal. I can tell you from experience that when I started eating greener initially the flavors seemed really earthy (too earthy almost), but by diligently forcing myself to eat veggies with every meal I eventually learned to love that earthy flavor. Now my body craves the veggies in an almost audible way.

 
I would say there are two main components to eating less meat and more vegetables - learning how to supplement the protein with other meat-free options and then consuming enough fats so that your body can break down the food it consumes.

Supplementing Protein:
Eating beans and rice is probably the best way to supplement regularly consuming meat. The two items together act as a complete protein. Some of my favorite types of beans are pinto, black, and garbanzo beans. They are ready to eat out of the can (always rinse first) or can be cooked with other ingredients. Adding beans (like garbanzos) to your salads is another great way to get some protein.

 
You can also use tofu and other soy based products as a supplement, but I would suggest using these less frequently as there are some studies linking soy to health problems.

 
Adding Enough Fats:
I was listening to NPR yesterday and there was a story about how cooking our food is really important. I think people assume that if they add "fats" to their salads in the form of dressing or sauté their food in butter or oil, they are taking away from the nutritional value of the meal. In fact, quite the opposite is true! Fats are necessary for our body to break down the foods we eat and absorb the nutrients. My friend and fellow blogger, Rachel, has a great article on her blog Find Your Core. Check it out for more information!

 
Other Tips:
Another good option for cutting back on meat is to make it a "side dish", meaning that the veggies take center stage in larger portions than the meat. This way you are still getting good, old fashion meat protein, but not consuming as much of it. Plus the veggies will help to move the negative things meat leaves behind through your body so it doesn't clog your arteries. (Personally, this is my favorite option. I love to eat meat!)

 
Finally, I'd say the best way to become a greener eater is to eat a home. While the food may be delicious, you have no idea what sort of ingredients go into your favorite restaurant meals. Even salads you get at restaurants can be low in nutrition (many use iceberg lettuce which is basically a "cop-out" lettuce). Going to the grocery store can be intimidating at first. It can be hard to judge how much food you actually need and what you will really eat. It takes some practice. I find going once every two weeks gives me enough time to consume most of what I buy before it goes bad, but doesn't leave me running low and scraping the cabinets for anything to eat, giving up, and going out for a burger.

8.05.2010

Summer Salad


I don't suppose it's fair to say that I have a favorite season for produce. Every season is my favorite and as they turn over I get excited for the change in available produce and the seasonal recipes. Since it's summer, I'll say it's my favorite. I love the fresh lettuces, cucumbers, tomatoes, and peppers. To bring some savory flavor to a salad I love to add a full-flavored cheese, like goat, blue or feta.

Summer Salad
Makes as much salad as you want

Ingredients:
Green leaf lettuce
Tomato
Cucumber
Red bell pepper
Goat cheese
Coarse salt
Freshly ground pepper
Preparation:
Wash and dry all veggies. Rip lettuce in to reasonably sized bites. Chop tomato, cucumber and red bell pepper and add to lettuce. Top with goat cheese crumbles, salt and pepper. Top with Honey Balsamic Vinaigrette and enjoy!
Tips:
For one serving of salad I use roughly three large leaves of lettuce, 1/2 of a tomato, 5 thin slices of cucumber (cut into quarters), and 1/4 of a red bell pepper. The nice thing about salads is you can make them as big or as small as you like.
I try and eat salads before my main course to fill up space so I don't eat as much of the heavier stuff.

8.03.2010

Delicious and Pleasing to the Eye

There is nothing worse than being grossed out at the sight of your food. It is for this reason that I think your food should not only be delicious but also nice to look at. I love the contrast of bright orange and yellow peaches on white products such as ice cream, heavy cream, whipped cream, milk, yogurt...really anything in the dairy family. It is a nice, bright, morning treat for the eyes. This recipe is a great healthy, summer option that makes me feel like I'm doing myself a favor.


Yogurt with Peaches, Bananas, and Granola
Makes two servings


Ingredients:


1 cup of plain yogurt
1 organic banana
1 organic peach
3/4 cup of organic maple granola


Preparation:


Put 1/2 cup of yogurt into two bowls. Slice the banana into 1/4 in rounds, add half to each bowl of yogurt. Slice the peach into wedges and add half to each bowl. Sprinkle half of the granola into each bowl. Consume and feel good about it!


Tips:


Look for yogurt without high fructose corn syrup. I think you'll be surprised by how many popular brands are chalk full of this over-processed, corn-based sweetener.

I like to use plain yogurt because I think the tartness really lets the sweetness of the bananas and peaches shine.

8.01.2010

Mom's Mushroom Turkey Burgers

I love red meat, but not everyone does, so it's nice to have a delicious white meat alternative. This recipe comes from the best cook I know, my mom!
Mom's Mushroom Turkey Burgers
Makes roughly 8 small sized burgers
Ingredients:

2 slices of whole wheat bread
8 oz of mushrooms
3 teaspoons of olive oil
1 medium onion
1-2 cloves of garlic
1 lb. of ground turkey
1 egg beaten
1 tablespoon of chopped fresh dill
1 1/2 tablespoons of Dijon mustard
1/2 teaspoon of salt
1/4 teaspoon of pepper
Preparation:

First prepare the mushroom mixture. Remove the crust from the two pieces of bread and tear into pieces. Clean and chop the mushroom. In a food processor, finely chop the bread and mushrooms. Saute on the stove with 3 teaspoons of olive oil for a few minutes, stirring often, and set aside to cool.

Chop both the onion and the garlic in the food processor until they are small bits. This makes it easier to mix with the turkey meat and form the patties. Mix the onion, garlic, dill, Dijon mustard, salt and pepper in a medium size bowl. Add the cooled mushroom mixture, turkey meat, and egg to the bowl and mix only until blended. Over-handling the turkey meat will make your burgers tough.

Form into small palm sized patties. Grill or bake for 4-5 min. per side, or until thoroughly cooked.


Tips:


The recipe calls for White Button mushrooms, but I like to substitute Crimini mushrooms. I think they have a fuller, more savory flavor.

If you can stand the texture, using your hands to mix the turkey meat and mushroom mixture with everything else is the way to go. It allows you to really blend everything together and get a good feel for the consistency of the mixture. If the mixture feels too wet, add some more chopped bread or some good old fashion bread crumbs.

Don't double recipe! I tried this once and the consistency came out all wrong. If you need more burgers, make a second batch.